Seamless File Transfer from AWS-EFS to GCP-Filestore Using POSIX and Agents Pool with GCP-STS service

INTRODUCTION:
Transferring files between different cloud platforms can be a complex task, especially when it involves moving data from Amazon Web Services’ Elastic File System (EFS) to Google Cloud Platform’s (GCP) Filestore. However, with the right tools and techniques, this process can be streamlined.
In this technical blog, we will explore the use of POSIX and Agents Pool to simplify the AWS EFS to GCP Filestore file transfer.
AWS-EFS:
AWS EFS (Elastic File System) is a fully managed, scalable, and elastic file storage service provided by Amazon Web Services (AWS). It is designed to provide simple, scalable, and shared file storage for use with AWS cloud services and on-premises resources.
GCP-Filestore:
GCP Filestore is a managed file storage service provided by Google Cloud Platform (GCP). It offers a high-performance, fully managed network file system (NFS) that can be easily integrated with GCP services and deployed alongside Google Compute Engine instances.
POSIX:
POSIX stands for Portable Operating System Interface, and it is a set of standards that define the behavior and functionality of operating systems, particularly Unix-like systems. POSIX standards aim to ensure compatibility and portability across different Unix-like operating systems. They define various interfaces, including file system operations, process management, interprocess communication, and more.
Transferring Files from AWS EFS to GCP Filestore:
To transfer files from AWS EFS to GCP Filestore, we can make use of POSIX and Agents Pool. The POSIX API provides a standard interface for file operations across various operating systems, making it easier to migrate files between different storage systems.
Steps to Be followed in AWS:
Step 1. Create an Elastic File system in AWS Selected Region is ap-south-1 Choose a name aws-efs and select your VPC in my case I have created Custom VPC My-vpc.

Step 2. Create Security Group for EFS go to Security Groups, Also select VPC for your Security Group.

- Now Add inbound traffic to security group
1. NFS — your VPC range
2. HTTP — allow for all ip
3. HTTPS — allow for all ip
4. SSH — your ip - Create Security Group

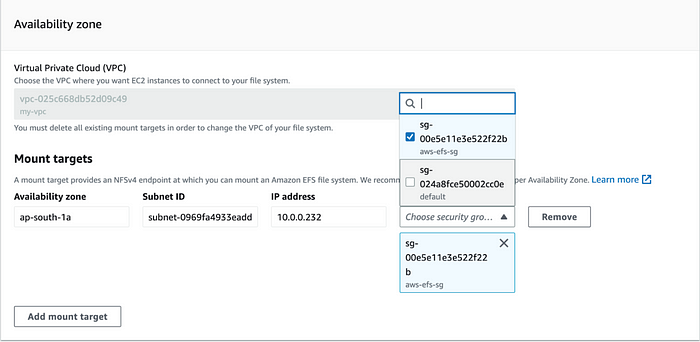
Step 3. Go to EFS File system that you have created in
Network Section > Manage Network
Change the Security Group Default to aws-efs-sg as mention below screenshot
Step 4. Create one EC2 VM with OS Ubuntu. Make sure to attach aws-efs-sg Security group to EC2 VM and create the VM.

Step 5. Now SSH in to your VM and mount your efs to your vmInstall Extras efs follow this link.
sudo mkdir /aws-efsMount efs to this /aws-efs directory use this command below
sudo mount -t efs -o tls fs-0b4e2ba34954c0288:/ /aws-efsNote: If you face this kind of issue you can

sudo pip install botocore
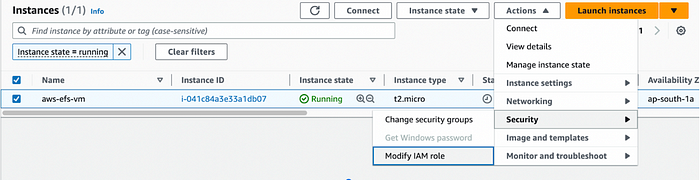
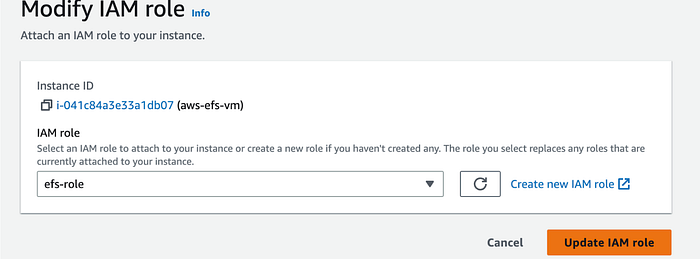
Step 6. In this step you need to create a role and add AmazonElasticFileSystemFullAccess
Go to your vm in Action > security > Modify IAM role
Step 7. Now update data into your mount file in my case my mount file is /aws-efs.

Steps to be Followed in GCP
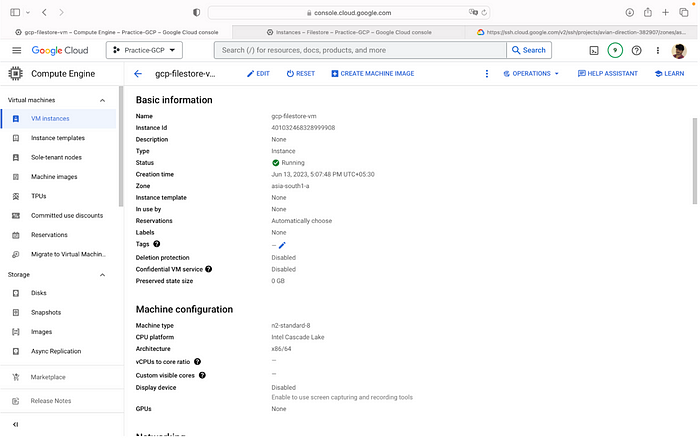
Step 1. Create Destination VM in the GCP in region Asia-south1 make sure to take n2-standard-8 machine type and also add TCP ports 80 (HTTP) and 443 (HTTPS) must be open for outbound connection.
Note: I have used n2-standard-8 machine type for different reason but you can also use any other machine type.
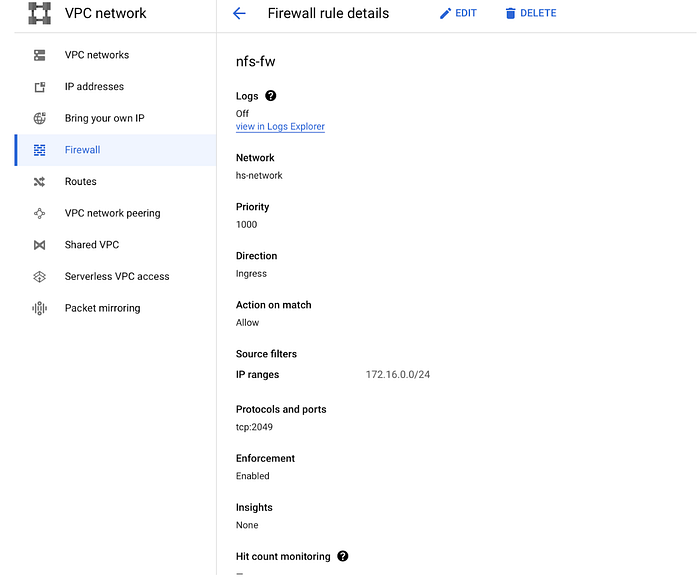
Step 2. Create one firewall for NFS on port no. 2049 also whitelist your VPC IP.
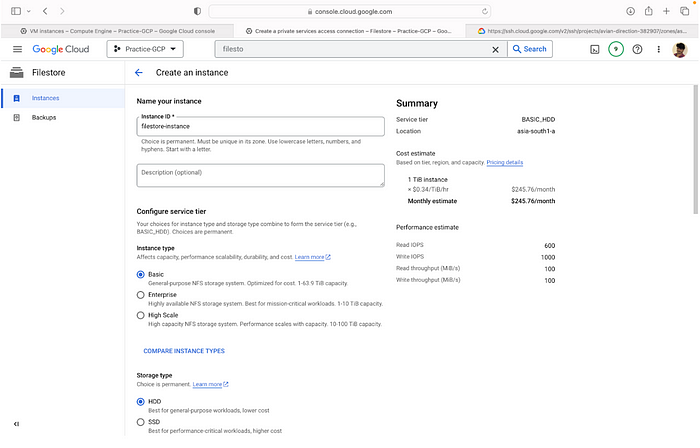
Step 3. Create one filestore instance in GCP.
Step 4. Mount your filestore instance to your compute engine VM, for that follow this steps-
1. SSH into your vm and run this command
sudo apt-get update
sudo apt-get install -y nfs-common
sudo mkdir /mnt/filestore
sudo mount 10.131.147.2:/filestore_data /mnt/filestore
NOTE: ( Here you have to give your filstore IP and fileshare name )
2. We can verify that filestore is mounted or not by running below command.
df -h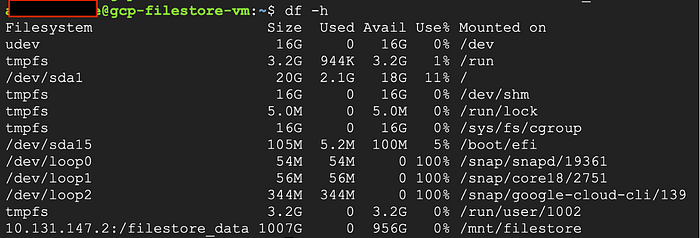
Step 5. Configure the mount to persist across reboots: Open the /etc/fstab file on the VM instance with a text editor:
sudo nano /etc/fstabStep 6. Add the following entry at the end of the file:
<Filestore instance IP>:/ /mnt/filestore nfs defaults 0 0Save the file and exit the text editor.
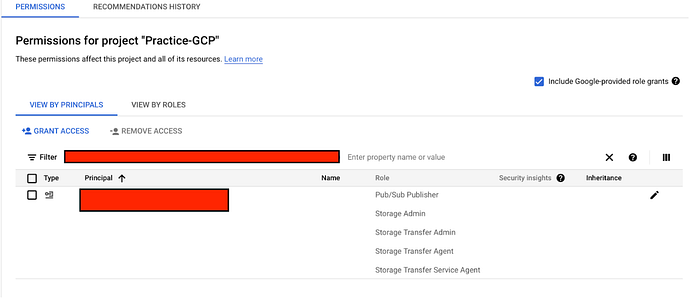
Step 7. We need to give some permission to storage transfer service’s Service Account.
Go to the IAM page in the GCP console and click the checkbox for “Include Google provided role-grants” . Search for ‘storage transfer agent’ and provide it
- Pub/Sub Publisher,
- Storage Transfer Admin,
- Storage Transfer Agent and
- Storage Admin permissions.
Step 8. Install Docker in both ( source and destination ) VMs by running the following commands
curl -fsSL https://get.docker.com -o get-docker.sh, sudo sh get-docker.sh and sudo systemctl enable docker
sudo usermod -aG docker $USER
Verify the docker service is running by executing the below command
sudo systemctl status dockerStep 9. In both the VMs, run following command to authenticate yourself in order to access and manage GCP resources.
Note: Before executing the following command you need to install gcloud in AWS VM using doc link.
gcloud auth login
gcloud auth application-default login
Step 10. Create a transfer pool agent for source VM by executing following command.
gcloud transfer agent-pools create test-source-poolStep 11. Create a transfer pool agent.
For destination VM by executing following command.
gcloud transfer agent-pools create test-destination-pooFor source VM by executing following command.
gcloud transfer agents install --pool=test-source-pool --count=3 --mount-directories=/aws-efsIn destination VM execute following command.
gcloud transfer agents install --pool=test-destination-pool --count=3 --mount-directories=/mnt/filestoreStep 12. Create a bucket “test-posix”of class “STANDARD”, type “REGIONAL”.
The region must be same as the one where VMs are created that is asia-south1. Versioning must be set off. There should be no retention policy. Create a folder named “shared” under the bucket.
Step 13. Create a GCS Transfer JOB. In GCP Transfer Service offers a Transfer Jobs feature that allows you to create and manage data transfer tasks easily.
Execute the below command to create the transfer job and transfer the data.
gcloud transfer jobs create posix:///aws-efs posix:///mnt/filestore \
--source-agent-pool=test-source-pool \
--destination-agent-pool=test-destination-pool \
--intermediate-storage-path=gs://test-posix/shared/
Step 14. Once the transfer job is created, you can monitor the status by navigating to data transfer > transfer jobs. Click on the latest job which corresponds to the job you created.

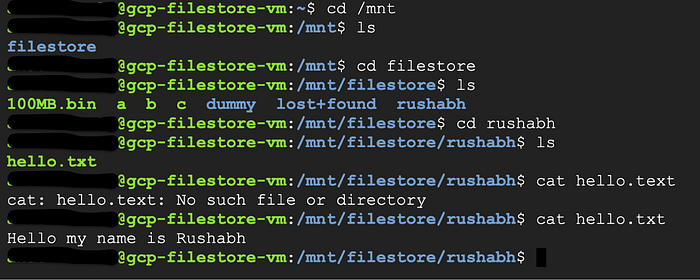
Let’s verify the data transfer from shell as well.
If the Transfer Job status was successful, check whether the files in /aws-efs from the source VM have been copied to /mnt/filestore in the destination VM.
SUMMARY:
This blog discussed the process of transferring files from AWS Elastic File System (EFS) to Google Cloud Platform (GCP) Filestore using POSIX compatibility and the Agents pool. The steps involved establishing connectivity, installing POSIX-compatible packages, configuring access permissions, synchronizing data, using the Agents pool for transfer, and monitoring the process. By following these steps, organizations can achieve a seamless and efficient file transfer between AWS EFS and GCP Filestore, leveraging the benefits of multi-cloud environments.
REFERENCES:
- https://cloud.google.com/storage-transfer/docs/file-to-file#gcloud-cli_2
- https://cloud.google.com/storage-transfer/docs/on-prem-set-up
Questions?
If you have any questions, I’ll be happy to read them in the comments.
Give a clap if you found this blog useful and share it with others. Open to feedback too.
Read my other Cloud and DevOps blogs.